Sun-Catchers

Cub and her friends have summer holiday. They wanted to make something crafty and we were scratching our heads as to what shall we make now. Since Sun is blazing here we thought why not we make some sun catchers. Following is their (I was just their crafty advisor! 😉 ) photo journey towards making colourful sun-catchers.

Kids busy painting

Kids happy painting

Some painted sun-catchers

I will paint this butterfly

Some more painted sun-catchers

Sun as sun-catcher

We allowed these sun-catchers to dry and then these were hung in Cub’s bed-window to catch some sun rays. Boys wore them around their neck too (I forgot to click their pics wearing their sun-catchers!)

Hanged Sun catchers

Turtle and Sun

(bad last pic but wanted to show you guys anyway 🙂 )

Hope you enjoyed kids’ efforts as much as they enjoyed making it.

Have a sunny day ahead 🙂

Love,

Sakhi

Painted Glass Candles

I had made glass candles with clear gel wax and gifted it to Swaps on his birthday last year. Cub wanted me to make one for her too. So this time I made painted glass candles for her. She liked it, hope you guys like it too 🙂

I took some shot glasses…

Shot Glasses to be painted

Painted these… (wanted to do different design but my gutta had dried out so chose to paint this way 🙂  )

Painted Shot Glasses

Put wick and wax to make the candles…

Painted Glass Candles

This is how these candles look from above

View From Top

We haven’t lighted these candles yet… will post a pic once we do it 🙂

Hope you liked the candles.

Ciao and take care 🙂

Love,

Sakhi

Turn around for boring canvas shoes…

I was tired of  Cub‘s boring white canvas shoes.

So I decided to give it a new look. It took some acrylic paints, brushes and some imagination to turn them around. Check for yourself what I could achieve. Cub loved the new look too. 🙂

And the side view to show some shading 🙂

Hope you guys like the transformation 🙂 Next time I might try some funky design.

Take good care of yourself and be safe.

Love,

Sakhi

Lovely gift

This post is dedicated to my lovely friend, Anubha. She sent me this handmade card and surprised me.

Look at the awesome figurine painted below. Isn’t it awesome. She took two days to make this one.

She just made my day. She also sent lovely, “Minakari” mirror from jaipur, which you can find here.

HUGS Anu, you made my day! 🙂

Love,

Sakhi

Silk Painting – Tutorial

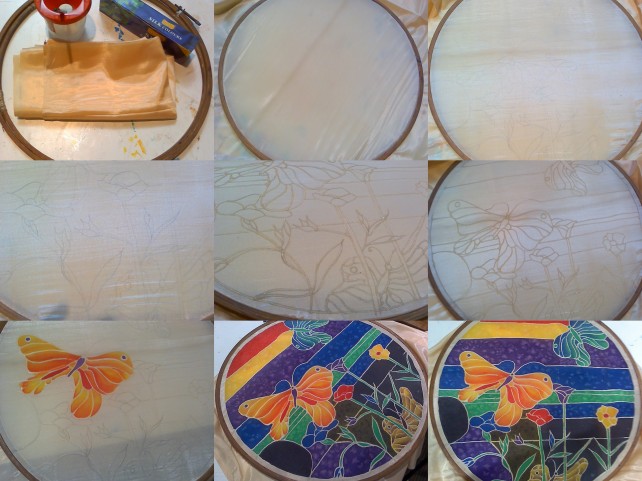
I tried painting on silk Scarf this time and thought of sharing the technique with you guys.

Material Used:

1. Silk Scarf / cloth

2. Silk Colours along with outliner

3. Ring to Stretch the Cloth

4. Pencil for drawing the design on the cloth ( you can get it traced professionally too!)

5. Painting brush

6. A rag and water dispenser

Method:

1. The desired cloth has to stretched on the ring so that the working becomes easier.

2. Draw the design you want to paint.

3. Apply the outliner on the design so that the colours won’t bleed or merge with each other. (You can work without the outliner when you want the merged effect.) Wait for the outliner to dry completely. This might take one and half to two hours.

4. Once the outliner has dried, start filing up the design with your desired colours. There’s no need to dilute the colour or add any medium. You can work directly from the container. Remember to start filling the colour from the center so that the colour will not bleed out side the liner. If you want to shade the particular part, do it when the colour is still wet.

5. If you want to give texture to the colour as its seen in the solid area, you can put salt grains (bigger ones) on the still wet colours. Beautiful star shaped texture will be visible. Again, it is mandatory to do it when the colour is still wet and remove the grains once the colour dries.

6. Let the colours dry for 24 hours and then iron the cloth on the back side. Take care to keep the temperature of iron on “Silk” mode.

7. Now you can wash you cloth.

silk-painting

P. S. These colours can be used on cotton material also. These colours are easier to work on cotton fabric as they bleed less and the effect is better than that of conventional fabric colours.

Bubble Printing – Tutorial

I love this project and so does my daughter… Its fun and the results are very good too! Lets see how do you guys like it!!

You will need!

You will need!

Requirements:

Flat Vessels or glasses

Water

Few Papers ( Here, I have used, A4 size computer print papers)

Drinking Straws

Liquid bathing soap or liquid vessel washing soap

Powder colours or Tempera colours or Water colours or Poster colours

Tempera Colours

Tempera Colours

Method:

1. Take a Glass and fill it up till 1/3, add a few drops of liquid soap (of your choice) and mix well but without working up the bubbles.
2. Add the desired colour to this liquid and again mix well. You will need more quantity for the lighter shades and less for the darker shades. Decide the quantity of the colour as per your requirement. Usually one tea spoon of colour is required.

Flat vessel for large paper sheets but amount of colour required is more!

Flat vessel for large paper sheets but amount of colour required is more!

3. Now work up the bubbles by blowing up through the straw as shown in the picture here. It is better to have a plastic or covering sheet beneath the glass or a flat vessel as the bubbles will come out or the glass and once kids are into this project they will make sure that bubbles COME out!! 🙂

It can really get messy, but kids love it!

It can really get messy, but kids love it!

Bubbles worked up in a glass!

Bubbles worked up in a glass!

4. Put the paper to be printed over the bubbles and take off immediately. You will see the prints over the paper. If you keep the paper for a longer time, it will get soggy as well as the bubble-print will not form properly.

Bubbles taken on the paper

Bubbles taken on the paper

5. Keep repeating this till the entire paper sheet is covered or till you are satisfied. You can use different colours on the same paper for the mixed effect too.

Another Colour!

Another Colour!

6. Use these papers for any purpose you want viz. wrapping paper, to prepare cards, to prepare photo frames or anything that comes to your mind.

different colour sheets!

Different colour sheets!

That’s all guys… Happy Bubbling!!  🙂   🙂