My first video tutorial :D

Hi guys,

Finally I managed to shoot a video tutorial on how to makeΒ larger bags with “We R Memory Keepers” gift bag punch board. A lot of craft friends wanted to know how to go about it. I thought a tutorial would help a lot of other crafters too. So here I am…

Since this is my first attempt at making a tutorial on a video, please excuse me for all the out of focus captures πŸ™‚

Enjoy crafting, be safe and stay happy πŸ™‚

Ciao,

Sakhi

Coptic Stitch – Handmade Journal

This is my first attempt at coptic stitch book binding. I think though I can definitely improve on my skills, I still liked the results. What say? πŸ™‚Β  πŸ™‚

Let’s see how I went about it…

Steps:

1. A4 size papers, folded into half

2. Make pin holes in the fold at equal intervals

3. Coptic stitch will bind these papers into a bound journal (the link to coptic stitch is provided for your reference, though I have learnt from somewhere else!)

4. Prepare your journal cover (I used a card board, a foam sheet and fabric)

5. Attach these covers to the bound journal

6. I have used a satin ribbon to give extra jazz (it is purely optional)

7. Voila… it is ready πŸ˜€


I am happy the way it looks. Now it will be gifted to a dear friend πŸ™‚

Ciao, till we meet again πŸ™‚

Love,

Sakhi

Pamper yourselves ladies…

Today is 8th March and it is celebrated as International Woman’s Day around the world. Though I feel personally that everyday is a woman’s day, today is special for a lot of ladies. So I thought why not make something which we can use to pamper ourselves πŸ™‚ Yesterday when I was blog-hopping I came across SeaSamAmb’s olive oil hand scrub tutorial and I decided to give it a try too.

Ingredients I used:

Sugar (3 tb spoons full)

Olive Oil (enough to mix with sugar but not to saturate it)

Various Dried Herbs of your choice (I used Oregano, Basil, Rosemary, Celery; a big pinch each)

Essential Oil of your choice (I used Lavender Oil, a few drops)

Other things needed:

A table spoon (to measure sugar)

A big bowl (to mix the ingredients)

A small bowl (to mix various herbs to make it ready for use)

A dropper (to measure essential oil)

Readied Ingredients to make the scrub πŸ™‚

Now the Procedure:

Procedure is fairly simple and quick. Take the sugar in a bowl, mix the dried herbs in it, put a few drops of your favourite essential oil (you can skip this if Β you do not want your scrub to be scented, the herbs have their own natural fragrance too) and pour olive oil into this mixture. Make sure that you pour the oil slowly so that your scrub is not runny. The oil should just be enough to turn this mixture in a lumpy texture.

Super cool, amazing scented hand and foot scrub is ready!

Now the packaging πŸ™‚

Gift packed

I not only packed it for me, but I gift packed some for one of my friends on woman’s dayΒ occasion. The flowers you see there are handmade from crepe paper and are tied to the threads of the jar.

Final pack to be gifted:

I finally made a paper bag from news paper and placed my gift in it for my friend.

I used this scrub just after I made it and it is amazing, made my hands softer and awesome smelling too πŸ™‚

Hope you enjoyed this tutorial as much as I enjoyed making it πŸ™‚

“Happy Woman’s Day” to all the amazing ladies out there πŸ™‚

Love,

Sakhi

P.S. My friend loved the gift and her smile made my day too πŸ™‚

P.S.S. You can use this as a body scrub or facial scrub too but since olive oil is quite oily you might not feel like using it on face especially in hot, humid weather (it’s too hot here in India already!)

Handmade paper – tutorial

Today I and cub had some time and also had my neice over, so we thought to make some handmade paper sheets from newspapers. Let’s see how we made it.

Materials used:

  1. Old news papers
  2. Half bucket full of water (to soak paper shreds)
  3. Paper masher or mixer grinder (to make paper pulp)
  4. Deckel
  5. Roller (to flatten the sheets)
  6. Old bed sheet or towel (to dry sheets on)
  7. Some extra newspapers (to keep the sheets in between to flatten them)

Method:

We started with shredding the newspapers into small pieces and then soaking them in water for three hours. Once the paper pieces were soft, we mashed them to pulp in the paper masher. You can use mixer grinder for the same purpose (I use paper masher as it doesn’t require electricity and hence, children can use them on their own without adult supervision).

After we pulped the paper, we made thin layer of this pulp on the deckle net and let the extra water drip out. We also decorated these sheets with flowers and leaves before pressing the sheets.

Once done, we put the sheets under the roller to squeez out excess water. Then these sheets were placed on old bath towel to dry them further. Once they were dry enough, we placed them between other newspaper sheets and put heavy books on top of it to flatten the sheets out.

What say guys, you like the end product?

These sheets can be used as greeting card or as keepsake or memorablia πŸ™‚ Hope you enjoyed this tutorial πŸ™‚

Love,

Sakhi

Tie n dye t-shirt: Tutorial

Cub wanted to tie n dye a tee shirt for herself but I was a bit skeptical for her to use traditional methods which use boiling of dyes. Hence, we both tried tie n dye with acrylic paints.

Materials used:

  1. White (or any light shaded) tee shirt
  2. Acrylic paints, brush and palette
  3. Rubber bands
  4. Water (to dip the t-shirt initially and also for the paints and brush)
  5. Water tumbler
  6. Old plastic sheet to cover the working space

Method:

First dip the tee shirt into the water and wring it dry. This will help in gripping the paints when applied. Once done, lay it flat on the plastic sheet that you have used to cover the working space. Now, pinch the t-shirt with from the center and swirl it as shown in the picture no. 2.Β  Complete the swirl and it will look like a flat pan cake (picture no. 3). Now, apply rubber bands to hold this swirl in place (Picture no. 4). Also, these rubber bands would not allow the colour to be taken on the fabricΒ  (i.e. it will resist the colour). once done, apply acrylic colours (a little runny so that it will be soaked up by the fabric). Use whichever shades you like, we have used the primary colours. Once done, let the pan-cake to dry for a few hours. Remove the rubber band and see how the pattern has come out.

And this is how it turned out. πŸ™‚ More brighter colours would have been better, I guess. But cub was happy with even this. πŸ™‚

That’s all for now. Ciao till the next post. Take care and be safe πŸ™‚

Love,

Sakhi

Birthday gift…

Yesterday was my best friend’s birthday and I was at loss as what to gift him. So me and Cub tried our hands on handmade, gel wax candles. Following is the photo-diary of our efforts. Hope Swaps like it…

1. The materials used… empty small glasses, assorted shells, some rangoli colours, some glitter, wicks and gel wax

2. Get the glasses ready with embelishments… (tip: don’t forget to put wick at this stage)

3. Melting wax over double broiler…

4. Pour the melted wax in the ready glasses… and voila, it’s ready!

(tip: you can change the colour of the wax by adding some shavings of wax crayons of your colour choice)

So, guys that was what presented to moi best friend.

Once again, Happy birthday Swaps πŸ™‚

Paper Marbelling – Tutorial

Cub is gonna meet her best friend when she goes home this Navaratri. We wanted to gift her friend, R,Β  something handmade. See what we made for R with paper marbelling!

Things we used for this project:

  • Marbelling Colours (available in the market as a kit or u can make your own by adding turpentine oil or kerosene to the oil paints)
  • PapersΒ  Sheets (preferably white)
  • Droppers (one for each colour)
  • Stylus to swirl the paint (You can use a twig instead)
  • Tray (any old tray that is 2 to 3 inch deep)
  • Water
  • Old Rag
  • Old News papers
  • Embellishments to decorate your marbelled papers (optional)

First we prepared the work station and lined it with old news papers so that we don’t mess our dining table. πŸ˜€

Then we added water to the tray till 3/4th level and added colours by dropper one by one.

Don’t forget to use separate dropper for different colours.

You can start by dropping colours in the center and see them spreading. There is no hard and fast rules as to where to put which colour. Let your imagination take reins. πŸ™‚

Next we swirled the colours with the stylus to give the marbelled look.

See what we got! πŸ™‚

Next we placed the paper gently over this swirled pattern. (Remember not to press the papers. It should not submerge in water, rather float on it.) Left it there for a few seconds and took it out and placed it on old news papers to dry.

It did not take too long to dry. We tried different patterns with different colour combination.

This is my favourite of the lot. Though it looks like a broken heart, it is a heart nonetheless! πŸ˜†Β  πŸ˜†

Check out how the dried marbelled sheets look like! πŸ™‚

A little bit of close up will give you a better idea.

Next, we gathered all these sheets, intervened with alternate pink sheets, jacketed them with textured papers and spiral bound them to make a diary for R.

Later on, Cub added some embellishments to decorate this diary. She has also made a handmade paper bag to gift R. Check it out here.

I sincerely hope R likes it. What say, guys? πŸ™‚

P.S. I have not mentioned anything about sizing of the water or preparing papers with alum as done by the professional artists. Will take that up some other time.

Love,

Sakhi

Woven Friendship belt – Tutorial

I know, I know it’s not a friendship day or something similar; but why should it be a special day to wish your loved ones! Right? So, I felt like making a friendship band for my friend and cub flicked it for herself.

Would you like to know how to make it? Well, today I will show you how to make the simple one. It’s so easy, even kids can do it. So let’s start…

You will need:

A Card board

Different coloured Skeins

and Scissors

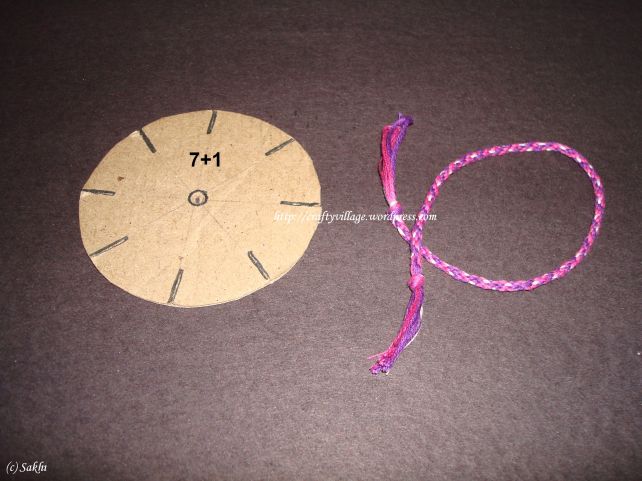
First cut the card board in a circular shape.

Divide the cardboard in eight equal parts and cut just at the edge as shown below. Also make a small hole in the center from where you will pass your threads.

If you want slightly thicker band you can also make the cardboard with 17 grooves as shown below.

Now, for 8 grooves board take 7 skeins of your choice of colours and for 17 groove board take 16 skeins of your choice of colours. Start with about half a meter length for each skein. Make a knot with all the skeins at one end and pass these skeins through the center hole. Once you have done that, seperate each skein and place in the grooves as shown below.

You can see that one slot is empty. This is the slot which is going to help us weave our belt. Now, count three threads from the empty slot towards your left and pick out the third thread and put it the empty slot. Now rotate the board and pick up third thread from left of the empty slot and put in the empty slot. Go on doing this for the rest of the length of the skeins. You will notice that your belt is being formed beneath the board as seen below.

When you are satisfied with the length of the belt, remove the threads from the slots, and pull them out of the hole. Finish the belt with putting a knot at the end of the belt. Cut the extra threads off.

You can add beads at the end to make it look more funky.

TIP:Β  Do not forget to detangle the skeins while you go on weaving by combing them now and then with your fingers.

I hope you guys enjoyed this tutorial.

Happy Weaving Friends! πŸ™‚

Love,

Sakhi

↓

Silk Painting – Tutorial

I tried painting on silk Scarf this time and thought of sharing the technique with you guys.

Material Used:

1. Silk Scarf / cloth

2. Silk Colours along with outliner

3. Ring to Stretch the Cloth

4. Pencil for drawing the design on the cloth ( you can get it traced professionally too!)

5. Painting brush

6. A rag and water dispenser

Method:

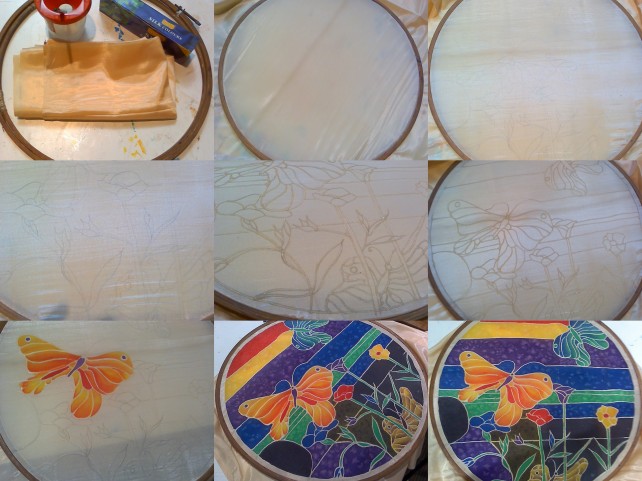
1. The desired cloth has to stretched on the ring so that the working becomes easier.

2. Draw the design you want to paint.

3. Apply the outliner on the design so that the colours won’t bleed or merge with each other. (You can work without the outliner when you want the merged effect.) Wait for the outliner to dry completely. This might take one and half to two hours.

4. Once the outliner has dried, start filing up the design with your desired colours. There’s no need to dilute the colour or add any medium. You can work directly from the container. Remember to start filling the colour from the center so that the colour will not bleed out side the liner. If you want to shade the particular part, do it when the colour is still wet.

5. If you want to give texture to the colour as its seen in the solid area, you can put salt grains (bigger ones) on the still wet colours. Beautiful star shaped texture will be visible. Again, it is mandatory to do it when the colour is still wet and remove the grains once the colour dries.

6. Let the colours dry for 24 hours and then iron the cloth on the back side. Take care to keep the temperature of iron on “Silk” mode.

7. Now you can wash you cloth.

silk-painting

P. S. These colours can be used on cotton material also. These colours are easier to work on cotton fabric as they bleed less and the effect is better than that of conventional fabric colours.

Pinhole scope/camera – Tutorial

Materials used to make my Pinhole scope / camera

Make a circle on the dark card paper with a pinhole in the center. This circle is to be slightly bigger than the small cylinder.

And paste it on one side as shown above.

Do the same with a butter paper and long cylinder.

Stick the butter paper as shown above and your pinhole scope/camera is ready!!

Put the long cylinder, butter paper side inside the short cylinder.

Decorate your cylinders as you like!

Adjust the length of the long cylinder by sliding it in the small cylinder and focus it on a bright, far object. You will be able to see the world upside down.

This was the first camera invented.

If time permits, i will also post the the model where you can capture these images on the film!

Happy viewing!! πŸ™‚